
Screen Resolution, PPI, DPI, and File Size Explained
A client recently asked me to provide a file at the “size” of 6000 x 4000 pixels for display on a large array of screens.
I wanted to know the resolution of the screen array for which it was intended. My question was “6000 x 4000 pixels at what PPI?” I was somewhat surprised to find that this information, the screen resolution, was not in fact readily available, and even more surprised to find how difficult I found it to explain exactly why I needed it!
How I would explain it now, after further reflection, is that a specification like 6000 x 4000 pixels by itself does not tell us the size or resolution of the file, because it doesn’t tell us the size of the pixels themselves.
Pixel size is not fixed – it is a variable.
The size of the pixel is determined by how many of them fit in an inch of screen (pixels per inch, or PPI). This may be more easily understood if we think for a moment in terms of print, in which we use dots (of ink) instead of pixels (dots of light).
We are familiar with printed images being made up of dots, and have all seen that that big dots mean low resolution, less detail, and that when we print smaller dots, more dots per inch (DPI), that we can achieve higher resolution, more detail, and finer gradations.
Screen resolution, or pixel density, works the same way. This is why PPI and DPI are interchangeable terms.
The pixel density of screens varies, just as the resolution of printers and prints do.
It used to be that pretty much all screens were made for 72 DPI. But screen resolutions have gotten considerably higher, and will continue to do so.
If I supply that 6000x4000 pixel file at a resolution of 72 DPI, and my client’s screen array resolves at 72 DPI, the image would appear to be approximately 83” wide (found by dividing 6000 by 72).
But if my client has a high-res screen, like a 4K, with a pixel density of 184 PPI, that same file would only appear to be 32” wide. If the screen resolution were to double again, to 368 PPI, the image would be 16” wide instead.
I suspect that most of us have observed this phenomenon when changing our computer resolution (often by mistake), and seen our desktop (alarmingly) either shrink or enlarge. A higher definition monitor, therefore, requires a bigger file.
The larger the screen - the greater the viewing distance.
What works in our favor, in terms of keeping file sizes reasonable for screens, is that generally the larger the screen, the greater the viewing distance. And greater viewing distance is more forgiving of lower resolution.
For a print example, consider a billboard, which uses a big dot pattern, because at a distance the dots blend together. It’s not until you get up close that you can see the dots. Likewise a Jumbotron screen at the ballpark is of a low resolution, because it too is seen only from a great distance.
This low resolution screen is also advantageous in terms of file size, because it can take relatively small files and render them very large.

10 Tips for Mastering Landscape Photography
Mastering landscape photography can be a lifelong pursuit.
From chasing the best light to shooting in inclement weather, dealing with crowds and lugging your prime lenses on a long hike, landscape photography is full of challenges. That said, there's no greater feeling than being surrounded by nature, pressing down the shutter and knowing you've just created a masterpiece.
Now, to help you on your next outdoor adventure, we've assembled a collection of simple yet powerful techniques to improve your landscape photography.
1. UNDERSTAND depth of field AND FOCUS
>> In landscape photography, focus is of paramount importance. For sweeping vistas, the simplest way to achieve sharp photos is to use a small aperture setting (such as f/8, f/16, etc ). The smaller your aperture (and larger the f/stop number), the greater your depth of field.
Here's a great overview of aperture and depth of field.
 Photograph by John Harrison Follow John on Instagram - Facebook
2. Work with weather
>> Sure, photographing landscapes on a bright and sunny day will produce nice and even images. However, braving the elements and shooting in inclement weather can lead to something far more striking, emotional and awe-inspiring. When preparing for your outing, make sure to scout your location beforehand and check the weather conditions in advance. Also, remember to protect your gear by packing preventive measures, such as a rain cover for your camera, cloths to wipe down your gear, extra batteries if it's cold ... and proper clothes for yourself.
 Photograph by Niall David Follow Nial on Instagram - Facebook - Twitter
3. Tripods can be your Best Friend
>> Most people use a tripod to prevent camera shake and ensure their photos come out sharp in low light or small aperture situations. However, for landscape photographers, "the waiting game" is another key reason to use a tripod. Basically, you'll want to find a perfect spot, put your camera on a tripod, frame your photograph ... then sit around and wait for the perfect light and moment to present itself. For extra insurance when it comes to camera stillness, consider investing in a cable or wireless shutter release.
 Photograph by Jay Graham
4. Experiment with your Foreground
>> One element that can make or break your landscape image is the foreground. When setting up your shot, consider using leading lines; or, try placing your horizon lower to capture a different and interesting perspective. Don't forget about your depth of field and remember to keep your aperture on the larger side to keep as much of your image in focus as possible.
 Photograph by Meghan Brabant Follow Meghan on Facebook - Instagram
5. USE LEADING Lines
>> Leading lines are extremely vital when it comes to photography, as you'll want to guide your viewer’s eyes across your image. Lines can help you guide your viewer's eye to the main point of interest and also create a feeling of depth and scale to your image. A few examples of natural leading lines you might find would be roads, railroad tracks, streams, pathways, etc.
 Photograph by Greg Goodman Follow Greg on Instagram - Facebook
6. Don’t forget about the sky!
>> A truly great landscape photograph has a well balanced mix of beautiful sky and captivating foreground. However, Mother Nature, time constraints or happenstance may have other ideas. In those situations, don't be afraid to focus on one of the two elements and see how the other falls into place. An interesting foreground can sometimes make up for a bland sky. Conversely, many landscape photographers fill most of their frame with a beautiful sky of dark or dreamy clouds. It's amazing how many different emotions the air above can convey. Have fun and experiment.
 Photograph by Josh Berger Follow Jsh on Instagram - Facebook
7. The Power of Movement
>> Though landscapes are usually sought after for their peaceful, quiet and overall serene qualities, landscapes can be a perfect place to capture movement. Take a moment to look around you and observe the wind rustling through the trees, birds in flight, waves crashing over rocks and even clouds moving overhead.
 Photograph by Justin Katz Follow Justin on Instagram - Facebook
8. Two words - Golden Hours
>> Twice a day, the landscape is bathed with beautiful golden light ... instantly making any photograph more warm, vibrant and magical. Specifically, the "Golden Hours" are the times just after dawn and just before dusk, when the sun is still low on the horizon. The light is a perfect shade of gold, which can create many interesting elements such as shadow, silhouettes and patterns.
 Photograph by Lisa Fielder
9. Find your Focal Point
>> Focal points are a crucial factor when it comes to photography. Without them, your image can come off as empty, dull and lacking purpose, which tends to make viewers move on rather quickly. Think carefully about your composition and always consider the rule of thirds to make your images come alive. You focal point could range from a building or structure to an interesting rock, tree, animal, person ... sky's the limit, so go out there and get creative!
 Photograph by Nathan Wirth Follow Nathan on Facebook - Instagram
10. Have fun and Experiment!
>> Photography is about having fun, so always remember to try new ideas and concepts and get out of your comfort zone! Good luck shooting!
 Photograph by Seth Dickerman

Why Prints Still Matter
In a world of digital media files, why does printing photographs still matter?
Whatever camera you use to make a photograph, a print is still the ultimate expression of your creative vision. Plus, they don't need power plugs to survive.

First, let's discuss the nostalgia of prints...
Forget what you've learned about the technical aspects of photography and remember why we press the shutter in the first place.
We photograph to remember ... to capture a moment in time that allows us to control both what we see and what the viewer takes away from the shot. Printing photographs allows a much more meaningful way to observe, improve and appreciate all the effort that goes into the work.
A printed photograph becomes a real object. It's something you can hold and touch, rather than an image among thousands you can see on a screen.
A print will last a lifetime
One of the best parts about printing a photograph is that prints typically withstand the test of time. Most professional papers are guaranteed to last at least 100 years, and a quick Google search for "photography from the 1800s" shows that your prints will probably last even longer.
Now, compare that to digital files and think about how technology is constantly changing. Remember floppy discs? VHS cassettes? Zip Drives? Even CDs/DVD's are on their way out. Apple has been ensuring this for years, as Macbook Pros don't even come with disc drives anymore.
With prints, you'll be able to leisurely enjoy your work for years to come ... without the worry of computer crashes, hard drive backups or rapidly changing technology. Sure, your negatives will still be digital, but at least you'll also have something tangible.
Prints help you grow as a photographer
Prints are also the best way to receive feedback on your work. If you are looking to improve and receive critiques on your photography, the easiest way to do so is by showing someone your prints.
Holding your printed work allows a fresh perspective where you will be able to notice different facets of your work that you might have missed before. Parts that are too dark, too light, dust, color variation...these are all things that might be overlooked on a computer screen.
Plus, a print will help you determine if you have correctly calibrated your monitor.
Printing matters as a professional photographer
As a professional and full-service photographer, there are many benefits to being able to produce high quality prints of your work. Let's explore a few reasons why:
CUSTOMER EXPERIENCE
Making prints for your clients shows that you care about their customer experience. Providing their images in their final polished form also shows that you are a full-service photographer, which is a rarity nowadays.

Image a scenario where a potential client wanted to see photographs of a wedding you shot. Instead of only being able to provide images on a screen, you can dazzle them with prints that they can physically hold and appreciate. It shows you care about your work, and are willing to go the extra mile to give your client what they want.
ADDITIONAL REVENUE
As a photographer, offering printed photographs gives the opportunity to make additional income instead of just making money from session fees.
QUALITY CONTROL
Quality control is essential for a full-service professional photographer! When you make prints for a client, you can control the quality of the finished product ... as opposed to leaving it up to your patron to produce their own (potentially off-color and low quality) prints.
SUPPORTING THE ART INDUSTRY
Above all, printing your work supports the intricate web of the art industry ... much of which is still locally-owned. In addition to getting a physical print, you are supporting businesses that help artists connect with clients, expand their trade and, above all else, continue doing what we love to do.
So, Why Do Prints Matter?
While the world seems to be propelling into a digital age with access to hundreds of thousands of images at a moments notice, it's important to remember what photography really stands for.
Photography is more than just a paycheck. It's the act of capturing a moment in time and preserving that memory for years to come.
When you take the time to learn how to be a professional and full-service photographer and improve your trade, you show that it's more than just about pictures, it's about loving what you do- and every client wants to see that in their photographer.


ICC Profiles » a photographer's guide
If you have ever taken a photograph or had one printed, you have dealt with color profiles … perhaps without even knowing it.
What may seem like an innocuous option in a drop-down menu might mean the difference between an accurate, high quality representation of your image and a lackluster, disappointing imitation. So, just what are color profiles and why are they important?
Every digital camera and printer has its own idea of what a specific color looks like. In order for the devices to communicate with each other properly — and reproduce the image without color distortion — they need to find common ground. That's where ICC profiles come into play.
What is an ICC profile?
An ICC profile is a set of data that characterizes a color input or output device (or a color space) according to standards promulgated by the International Color Consortium (ICC).
The International Color Consortium was formed in 1993 by eight vendors in order to create an open, vendor-neutral color management system, which would function transparently across all operating systems and software packages.
ICC profiles provide a common understanding between multiple editing programs such as Photoshop, Lightroom, Capture One and others.
These profiles act as languages of color and compression, interpreting the image as close as possible across devices; from the camera to the monitor, the monitor to the printer, the printer to the paper. If these settings are not aligned across the different platforms, information gets lost in translation.
An Intro to Color Profiles & Color Spaces
In order to have a clear understanding of ICC profiles, you have to be familiar with color profiles and spaces.
Color profiles include CMYK, RGB, LAB, etc with more specific versions depending on the output. Each one represents a color gamut, which basically represents the range of colors that are supported. A printer has it’s own specific gamut of colors it can print, as does a camera when it captures an image.
Additionally, a particular paper has it’s own color gamut ... as does a specific monitor. Ultimately, different types of printers, cameras, papers, and monitors all have their different color gamuts.
For now, let’s focus on the camera.
On it’s own, a camera’s color information doesn’t really mean anything. Before the data it collects can be useful, we need to know the specific colors that the information corresponds to. That's why we map the colors in the image into a color space.
A color space is basically a standard that defines a specific set of colors. When we map the colors in our image into a color space, then the color values that our cameras captured have specific meanings. Now you may not know this, but most cameras have been mapping their colors into a color space all along.
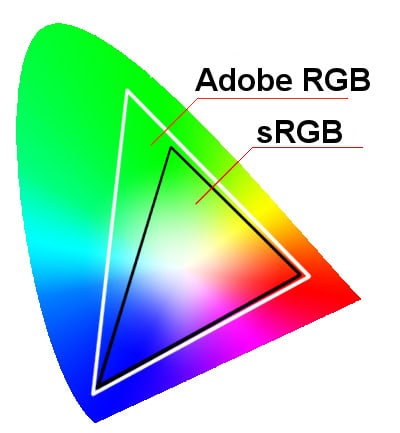
Most SLR cameras offer a choice of two color spaces — Adobe RGB 1998 and sRGB — which are the most common color spaces (gamuts) for images used for display (digital format, web, monitors, projectors, etc).
The shortcomings of sRGB
Currently, sRGB color space is the default color space on most cameras (Canon, Nikon, Sony, etc.) and photo editing systems, such as Photoshop, Aperture, Lightroom, etc. Unfortunately, sRGB tends to lose a lot of colors out of spectrum.
If you shoot in a format such as JPEG, image information, including color, is compressed and lost. Instead, we suggest shooting your images with the RAW setting, because no information is compressed, allowing you to produce higher quality images.
Below is an example of the difference between sRGB profile and Adobe RGB profile. Note how many more colors, especially green, are made available with Adobe RGB.
How to Use an ICC Profile
In order to produce the highest quality image, it’s important to play attention to your ICC profiles. Each printer, computer, camera, and paper all will have their own unique ICC profile and will allow you to be able to pick and choose which you like best for your work.
So now that we know how important ICC profiles are when it comes to taking, editing, and printing your images, how do you use them? Here's a step-by-step example using the ICC profiles we have available for D.I.Y. printing at Dickerman Prints!
First, download your preferred profile:
HOW TO INSTALL AN ICC PROFILE ON MAC

- Locate and unzip the file you just downloaded
- Open a separate Finder window
- From the main menu, select "Go -> Go to Folder"
- Type in the following: ~/library/colorsync/profiles
- Drag the profile from your downloads folder into the colorsync folder that you just opened
- That's it!
HOW TO INSTALL AN ICC PROFILE ON WINDOWS PC
- Locate and unzip the file you just downloaded
- Right click on the unzipped ICC file and select "Install Profile"
- That's it!
Setting up an ICC Profile in Photoshop
1. Make sure you have restarted Photoshop after installing your ICC profile.

2. From the main menu, select "View -> Proof Setup -> Custom"
3. Under "device to simulate," select the option for either:
Polie_FujiRA4_Matte or Polie_FujiRA4_Glossy
4. Once selected, the rest of the window should look like the image to the right.
5. Click save, name your profile and click OK to close the window.
6. To confirm that it has been installed, you can once again use the menu and navigate to "View -> Proof Setup." On the bottom, you will see a new option with whatever name you specified in Step 5.
HOW TO USE AN ICC PROFILE IN PHOTOSHOP
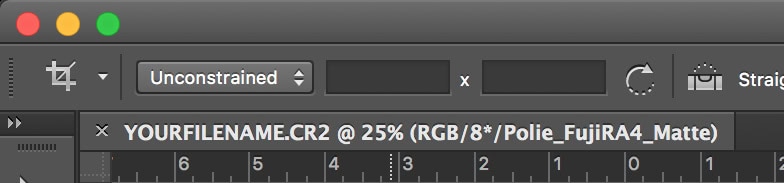
To use your new profile, simple press command + Y (Mac) or control + Y (PC)
To confirm that it's working, look at the filename of your active document. At the end, you should see the name you specified earlier.
HOW DO I OPTIMIZE MY IMAGE USING THE ICC PROFILE?
After activating the ICC profile, you may notice a shift in colors. What you are seeing is a more realistic representation of what your image may look like when printed. You should use these colors as a guide when prepping your images for printing.
Also, please keep in mind, our ICC profiles are meant to be used with a properly calibrated monitor. If you want to ensure that "what you see is what you get," please feel free to bring your files into our lab and use our complimentary and calibrated workstations! Organic espresso and tea included!

A brief timeline of the history of photography!
Photography is something most of us practice everyday. Whether it be from taking a simple photo of your food to landscapes– photography continues to illuminate our lives and intrigue us.
But how did we get to this point in technology– where it's as easy as pulling out your phone to take a photograph?
Let's revisit history to see the evolution of photography!
5TH CENTURY B.C. ⇢ Chinese and greek philosophers describe the basic principals of optics and the camera.
The Chinese were among the first to discover the idea of the basic pinhole camera. Around 5th Century B.C. they wrote about how an image was formed upside down from a "pinhole" on the opposite wall.
 An example of how a pinhole camera works
4TH CENTURY B.C.⇢ The Greek philosopher Aristotle discussed pinhole image formation in his work.
“Why is it that an eclipse of the sun, if one looks at it through a sieve or through leaves, such as a plane-tree or other broadleaved tree, or if one joins the fingers of one hand over the fingers of the other, the rays are crescent-shaped where they reach the earth? Is it for the same reason as that when light shines through a rectangular peep-hole, it appears circular in the form of a cone?"

1021 A.D. ⇢ The invention of the camera obscura is attributed to the Iraqi scientist Alhazen and described in his book of optics.

1664-1672 ⇢ Sir Isaac Newton discovers that white light is composed of different colors by refracting white light off a prism.
 Our modern understanding of light and color begins with Isaac Newton
1685 ⇢ The vision of a box form of a Camera that was portable and small was was envisioned by Johann Zahn, THOUGH it would be nearly 150 years before technology was able to bring his vision to life.
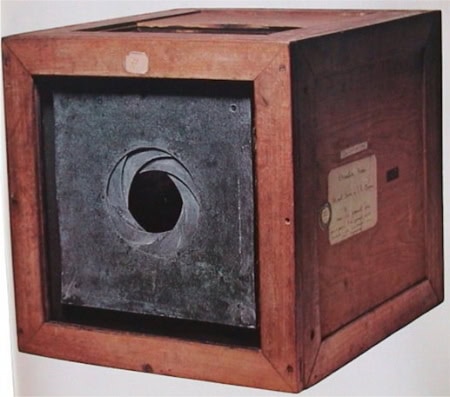
1717 ⇢ Johann Heinrich Schulze discovered that silver nitrate darkened upon exposure to light.

1816 ⇢ Frenchman Joseph Nicephore Niepce constructed a wood camera fitted with a microscope lens.
He succeeded in photographing the images formed in a small camera, but the photographs were negatives- meaning they were darkest where the camera image was lightest and vice versa. They were not permanent in the sense of being reasonably light-fast; like earlier experimenters, and Niépce could find no way to prevent the coating from darkening all over when it was exposed to light for viewing. Disenchanted with silver salts, he turned his attention to light-sensitive organic substances.

1826 ⇢ Joseph Nicephore Niepce invented Heliograph, which he used to make the earliest known permanent photograph from nature, View from the Window at Le Gra.
The process used bitumen, as a coating on glass or metal, which hardened in relation to exposure to light. When the plate was washed with oil of lavender, only the hardened image area remained.
View from the Window at Le Gras required an extremely long exposure (traditionally said to be eight hours, but now believed to be several days) which resulted in sunlight being visible on both sides of the buildings.
 The oldest surviving photograph of the image formed in a camera – View from the Window at Le Gras
1837⇢ In collaboration with Joseph Nicephore Niepce– Louis Daguerre invented the first practical photographic process, which was widely used in portraiture until the mid 1850s.
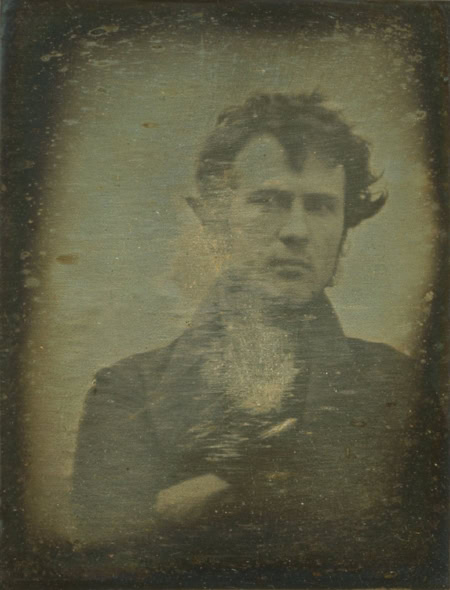
The image below is one of the world's first photographic self portraits. It was taken by Dutch migrant, Robert Cornelius, in 1839 outside his family business in Philadelphia, USA. The back of the daguerreotype reads: "The first light picture ever taken".
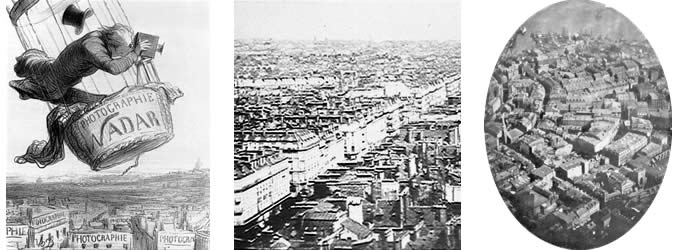
1837⇢ The first aerial photograph was taken by Gaspard Felix Tournachon of Place De L' Etolie, Paris. It was shot from an altitude of 520 meters in a tethered balloon.
1861⇢ Scottish physicist James Clerk Maxwell produced the first color photograph in 1861.
Maxwell created the image of the tartan ribbon shown here by photographing it three times through red, blue, and yellow filters, then recombining the images into one color composite

1871⇢ Dr. Richard Maddox discovered a method of using gelatin instead of glass as the plate material for the light-sensitive solution.
This discovery led to the invention of dry plate photography, a less cumbersome process that did not require the photographer to use a darkroom tent for immediate plate development as had been required by wet plate processes.
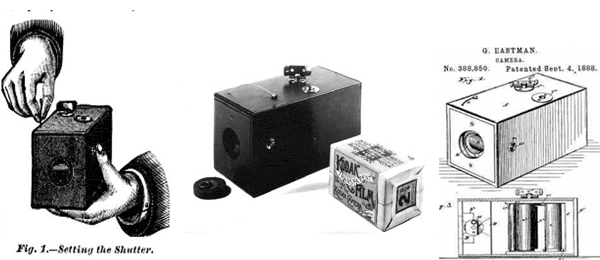
1884- 1888⇢ George Eastman introduced celluloid based film in and the small portable easy-to-use box camera.
His first camera, which he called the "Kodak," was a very simple box camera with a fixed-focus lens and single shutter speed, which along with its relatively low price appealed to the average consumer.
The Kodak came pre-loaded with enough film for 100 exposures and needed to be sent back to the factory for processing and reloading when the roll was finished. By the end of the 19th century Eastman had expanded his lineup to several models including both box and folding cameras. Photography could now reach the masses.
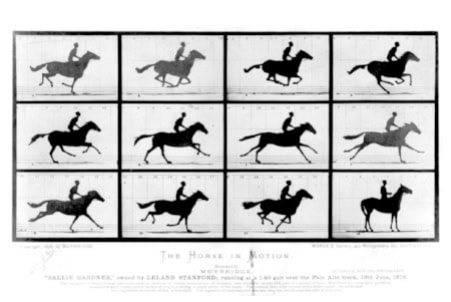
1878⇢ Eadweard Muybridge successfully captured the sequence of movement. It was this ground breaking discovery and technique that helped invented motion pictues.
1884- 1924⇢ The camera went into production at the Leitz factory in Germany. It was called the Leica from the initials of "Leitz Camera."

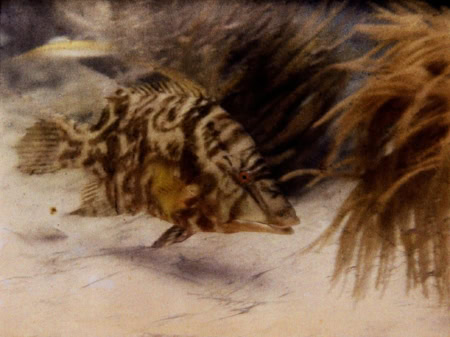
1926⇢ Underwater color photography was born with this shot of a hogfish, photographed off the Florida Keys in the Gulf of Mexico by Dr. William Longley and National Geographic staff photographer Charles Martin
Equipped with cameras encased in waterproof housing and pounds of highly explosive magnesium flash powder for underwater illumination, the pair pioneered underwater photography.
1929⇢ The major step forward to mass marketing of the TLR (twin-lens reflex) came with the Rolliecord and then rollieflex, developed by Franke & Heidecke in Germany.

1936⇢ The first 35mm SLR, the Ihagee Kine Exakta had a left-handed shutter release and rapid film wind thumb lever, folding waist level finder and 12 to 1/1000th second focal plane shutter.

1948⇢ An entirely new type of camera is introduced– the Polaroid Model 95. It was the world's first viable instant-picture camera. The Model 95 used a patented chemical process to produce finished positive prints from the exposed negatives in under a minute.

1949⇢ A historic camera: the Contax S— the first pentaprism SLR for eye-level viewing.

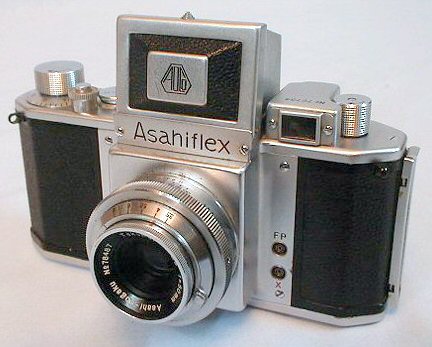
1952⇢ Asahi's first model, the AsahiflexI, was the first Japanese-built 35mm SLR.
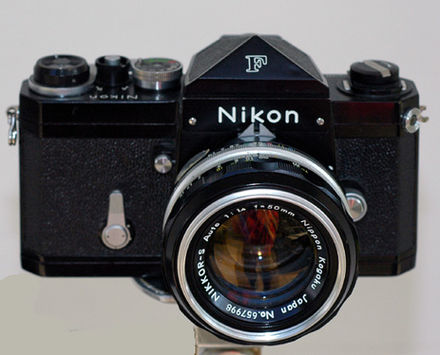
1959⇢ The nikon f— the first Japanese system camera with interchangeable components that constitutes the core of a system.
1975⇢ The first ever digital camera was invented by Steven Sasson, an engineer at Eastman Kodak.
The 8 pound camera recorded 0.01 megapixel black and white photos to a cassette tape. The first photograph took 23 seconds to create.
To play back images, data was read from the tape and then displayed on a television set.
 We've come a long way since then!
1984⇢ Steve McCurry captured one of the most famous portraits the world had ever seen.
The Afghan girl with the haunting green eyes captivated everyone. That captivation proved, once again, the power of photography to open eyes—and hearts and minds—with a single image.
 The portrait appeared on the cover of National Geographic in June 1985
1988⇢ Though it never hit the market the 1988 Fuji Fujix DS-1P introduced an important technology– a removable SRAM (static RAM) memory card developed with Toshiba.

1993⇢ Unlike many other digital cameras that stored photos in “volatile” memory that required battery power to prevent file loss–
this video graphics array (VGA) resolution camera was the first to save image files in the kind of solid-state flash memory that is now the near-universal storage medium in digital cameras.

1994⇢ Generally believed to be the first consumer (under $1,000) camera to take color images on a single sensor, the QuickTake, designed by Kodak and manufactured by Chinon in Japan, captured at VGA resolution. It represented the first take on photography by Apple.
 This is where it all started for Apple!
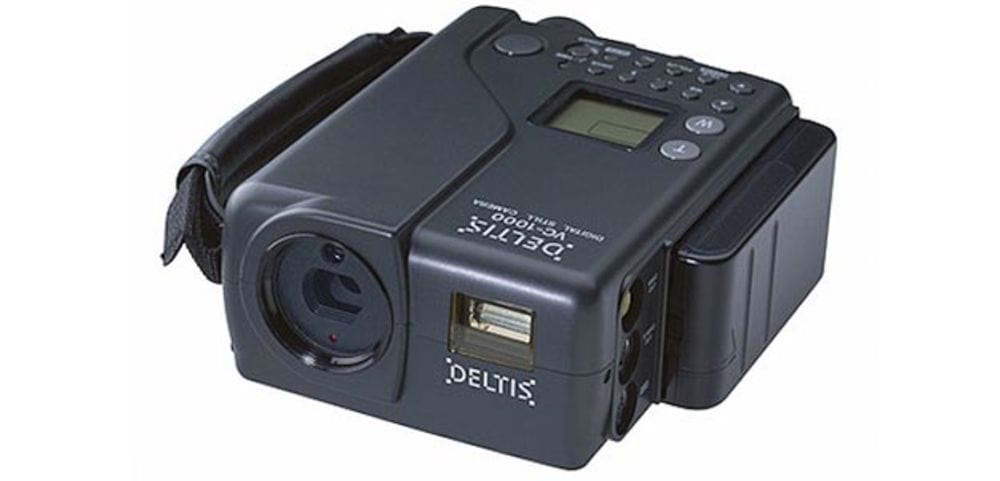
1994⇢ Foreshadowing the camera phone and Wi-Fi-equipped cameras that wouldn't appear until many years later, the 1994 Olympus Deltis VC-1100 model was the first digital camera with the ability to transmit images over a phone line, without the intermediary of a computer or other device!
1999⇢ The Kyocera VP-210 introduced a concept that we still use frequently today– phone photography!
It could store 20 stills and transmit live “video” at a rate of 2 fps. Sharp soon followed with its J-SH04, developed with inventor Philippe Kahn, whose 1997 prototype phone was the first to transmit a photo—of his baby daughter.
 Compare this to your iPhone 7 !
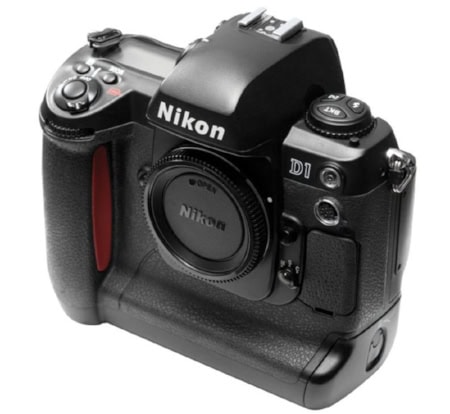
1991⇢ The Nikon D1 was the first DSLR body designed from scratch by a single manufacturer. It competely changed the game for SLRS at that time- dropping the price of a digital SLR by more than half.
The original price the camera was sold at just under $5,000. It offered the image quality, build, and performance that was required by photojournalists at this time. It, and DSLRs from Fujifilm and Canon, also helped end the reign of Kodak in professional DSLRs.
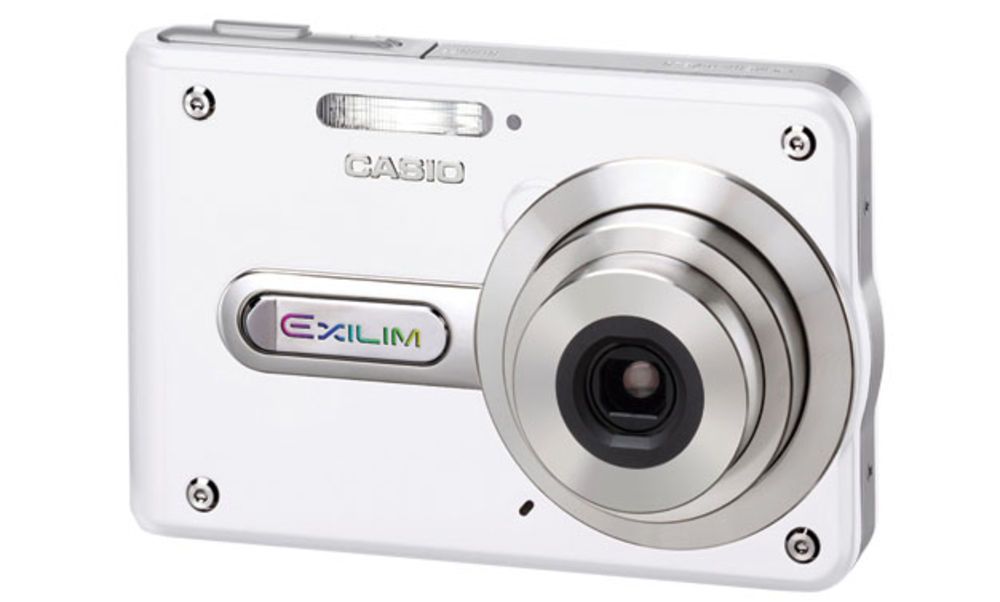
2002⇢ The Casio Exilim EX-S1/EX-M1 leapt forward in the ultracompact design race with the 0.4-inch-thick EX-S1 “wearable card camera.”
2003⇢ When this 6MP DSLR was announced on the Internet, editors scurried to redo the cover to trumpet the first DSLR priced below $1,000 ($999.99, street, with kit lens). The Reb flew off the shelves and proved the tipping point for countless serious amateur photographers to switch from film to digital.

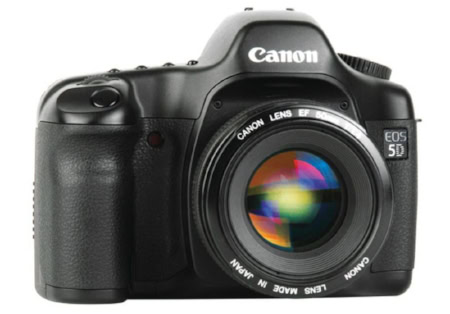
2005⇢ The Canon EOS 5D had the popular new market category all to itself until 2008, when Nikon and Sony released their D700 and Alpha 900.
It was Pop Photo’s Camera of the Year for ’05 provided full-frame capture to serious amateur photographers and cash-strapped pros for the first time, with a price less than half of the bigger, heavier professional full-framers.
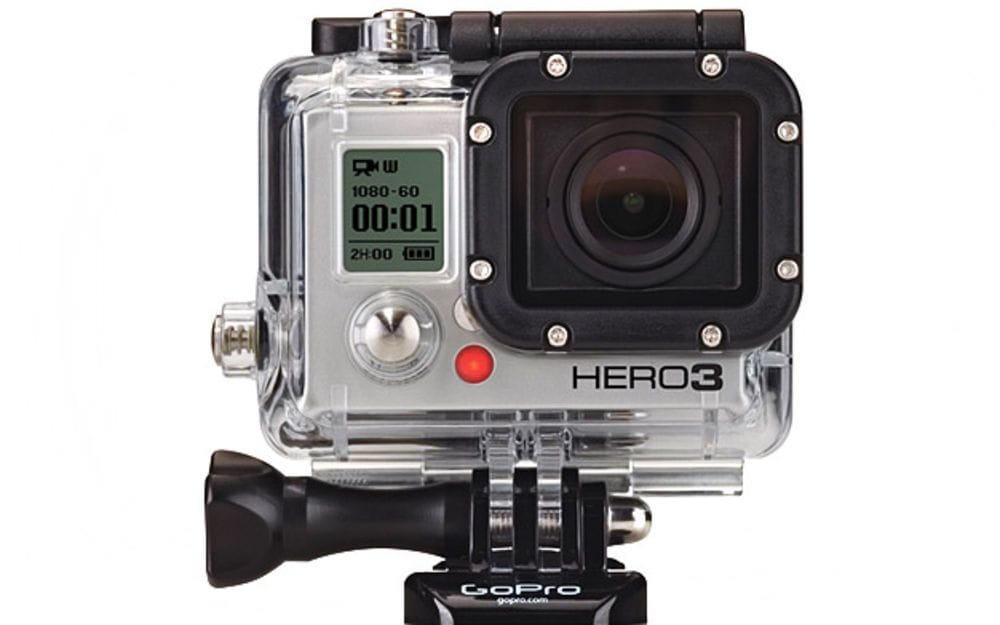
2007⇢ The Go Pro Digital Hero 3 is introduced to the market and offers go-anywhere cams with rugged cases. Now most people who do sports, ride bicycles, even drive cars have these.
2007⇢ The first ever Apple Iphone is introduced. Though Apple was not the first to include camera phones– they combined a simple camera interface, intuitive downloading and sharing tools, and, in 2008, a highly accessible platform for third-party photo apps– making these incredibly popular.
 Notice the phone company provider's name is Cingular... !
2008⇢ Polaroid announces it is discontinuing the production of all instant film products, citing the rise of digital imaging technology.
![]()
![]()
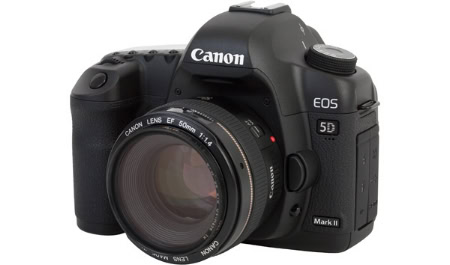
2008⇢ The Canon EOA Mark 11 is introduced.
Although not the first (by about a month) to offer video on a DSLR, the quality of the video was so good that it was single-handledly responsible for kick starting the now widespread use of DSLRs in the broadcast film and TV industry, in which it has become ubiquitous.
It has been widely used to shoot TV shows such as House and even for movies, in addition to its' enormous popularity among landscape photographers.
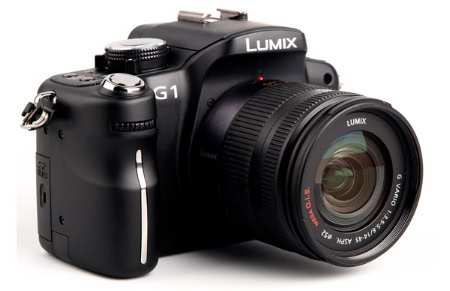
2008⇢ When Panasonic took the mirror and prism assembly out of a DSLR and replaced them with an electronic viewfinder, the resulting camera, the Lumix G1, became the world’s first Compact System Camera.
Not only is this the fastest growing sector within the camera industry it’s one of the fastest growing of any consumer electronics category – it now accounts for almost half of all interchangeable lens cameras sold in Japan, for example while it’s approaching one third in Europe.
The main advantage of the CSC is in offering relatively high image quality, and interchangeable lenses, in a small camera, with smaller lenses. But by casting aside the optical assembly from DSLRs the G1 also paved the way for the wide spectrum of interchangeable lens cameras we see today, from every manufacturer, which come with or without viewfinders, and with a variety of sensor sizes from DSLR sized down to compact camera sized.
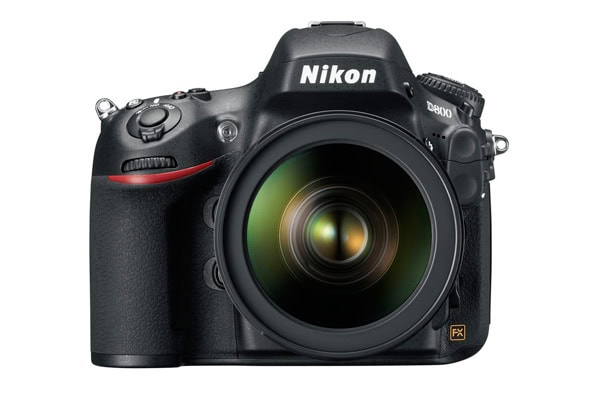
2012⇢ The Nikon D800 comes to the market with an unprecedented 36 million pixel full frame sensor.
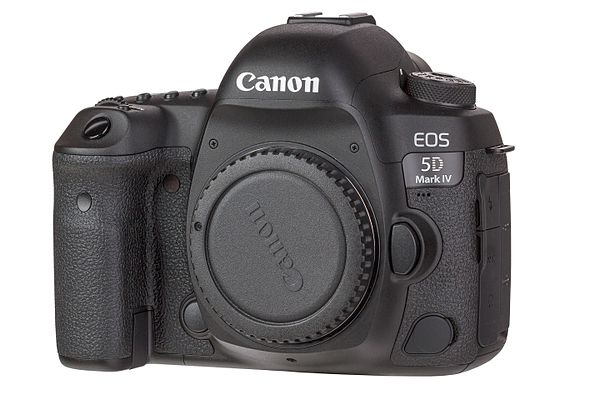
2016⇢ The Canon 5d Mark IV is relased as a whopping 30.1 megapixels full frame digital single lens-reflex with the ability to shoot video in 4k.
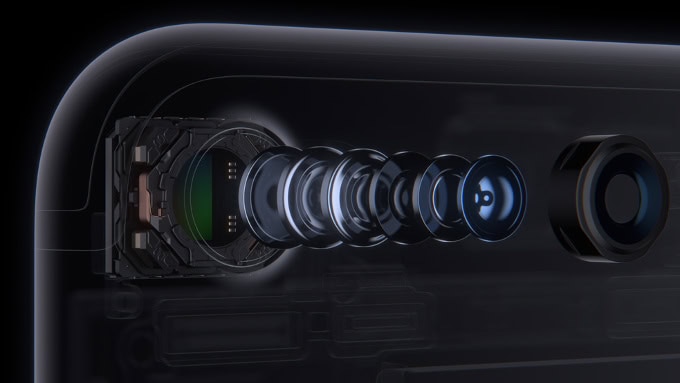
2016⇢ The iphone 7 introduces its latest in camera technology- a camera has a six-element lens and a 12-megapixel sensor.
The camera now comes with optical image stabilization and A f/1.8 aperture that captures 50% more light means you’re going to get much better pictures and videos in low light conditions.
Photography has evolved a lot over time. The question is, where will it go next?
Leave a comment below on where you think photography might be heading in the future!

5 Amazing Photo Editing Apps (not made by Adobe)
While Adobe Photoshop and Lightroom rule the photography kingdom, there plenty of things they just can't do. Fortunately, both programs allow users to install plugins and filter sets to further enhance your photography.
The below list features some of our favorite apps - all of which play nicely with Adobe's Creative Suite.
Topaz Labs
Best known for Topaz Adjust, Topaz Labs also includes fabulous plugins for clarity, noise, detail, glow, special effects and more. These are, perhaps, the most popular filters currently available to photographers.
 A before and after photograph using Topaz Adjust
MacPhun
This great suite of photography apps and plugins includes the powerful Intensify – which gives your images a vibrant HDR look from a single photo. Another great app is Snapselect – an ultra-fast photo browser that isolates similar photos and helps you choose the best ones before import. (sorry PC users... it's just for Mac)
 Inside the MacPhun Intensify app.
Exposure
This powerful photo editing plugin allows you to recreate that old film look and feel on your digital images. Draw attention to your subject by manipulating focus, vignette and depth of field... and more. Exposure offers an endless array of visually creative options; from simulation of fast lenses to tilt-shift and motion blur looks.
 Photo © Christopher Wilson - Created with Exposure
Perfect Effects 9.5
Enhance your photography by using Perfect Effect’s suite of beautiful and timeless filters. Highlights include lens flare, tilt-shift, faded matte, pastel bliss, silver sunset, vintage sun, color pop and more.
BlowUp 3
Ever want to get a large print out of a small digital photograph? With BlowUp’s amazing enlarging plugin, you can cover an entire wall with a photo from a 3 megapixel camera. At Dickerman Prints, we use this plugin for all our custom photographic enlargements.
 BlowUp 3 lets you get the most detail possible in photo enlargements.

5 Ways to Get More Instagram Followers
We love sharing your photography at Dickerman Prints: especially on Instagram.
Every day, we feature a mix of photos from our community; and a behind-the-scenes look at the the inner-workings of a photo printing lab.
Just like you, we work hard to create a beautiful gallery of photography on Instagram. But, how do we get more Instagram followers and what are the secrets to running a successful feed?
That's what our in-house expert, Melisa Phillips, is here to talk about.
"I've been using Instagram and growing my following for the past several years.
Over that time, many friends have asked what steps they can take to improve their own following.
Based on those discussions, I have come up with these 5 Easy Ways to Increase Your Instagram Following."

1. Like more photos
The best way to spread good vibes & attract more likes to your own images is through liking other people's images.

Developing a habit of giving likes as you look at Instagram, can help you to gain more likes & followers to your work. It's as easy as double-tapping your smartphone while you scroll (you'll see a heart of the image when it works).
2. Follow more
Similar to #1, following more Instagram Users will usually increase how many people are following you. It’s not always a 1:1 ratio; but, the more you Follow, the more people will return the favor and follow you back.
3. Use #Hashtags
Hashtags are searchable terms you can add to your images; which allow other Instagram users to find your image. For example, an image of a rusty lock could have the hashtag #rust #lock #rustystuff - as well as many others.
Adding hashtags greatly increases your image's exposure on Instagram - by helping people to find your photo.
Helpful Tip: Be sure to include your hashtags as a comment on your own image. Only hashtags that you post will show up in a hashtag gallery search.
4. Niche, if you can

If you are so inclined to be a photographer of one certain thing - city doorways, architecture, flowers, cats, rust, cars, etc, - Instagram will reward you for this focus.
People like to know what to expect, and are more likely to follow you if they like your topic. My friend Emily Citraro quickly quadrupled her following when she dedicated her feed to flower photography.
That said, not all photographers want to shoot only one subject matter: myself included. But, if you can dedicate your feed, you will be rewarded with more Instagram followers.
5. Avoid Overposting
Posting a few images each day is OK. But, when it turns into dozens a day, many people will unfollow you for clogging up their feed with too many images.
The sweet spot seems to be 3-4 images a day. Be sure to pace them a few hours apart, if possible, to allow your audience time to enjoy each image: one at a time.
Got questions? We're here to help!
Using these 5 basic steps is a great starting point for increasing your Instagram following . Take them to heart; and you are sure to develop habits that encourage your popularity and expand how large of an audience you reach.
Want more Instagram info? Ask us anything in the comments section below.
Thanks for reading and happy Instagramming!
Be sure to follow Dickerman Prints on Instagram


Hipstamatic
There are a bazillion IPhone and Android camera apps to manipulate your images with. One of the best camera apps we've used is Hipstamatic which, we're sure, you've already discovered.
Hipstamatic allows you to select multiple film/ lens combos which will give you hundreds of options to choose from. This selection below (shot around Dickerman Prints this morning) uses just one B/W combo we really like. Download the app to find your favorite combo!

 Dickerman Prints printing master, Garnell Boyd.


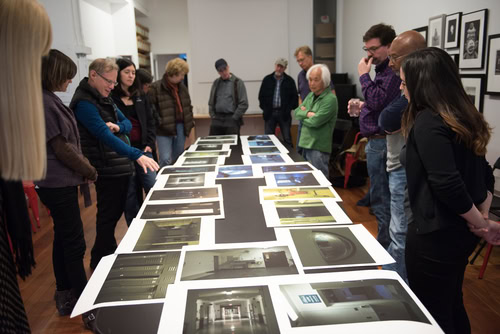
Great Exhibition Spaces in the Bay
Here’s a list of some great local photography spaces, some of them non-profits, community-based, or all-around amazing.
Southern Exposure
SFCamerawork
Mission Cultural Center
Goforaloop
4×5 Gallery
PHOTO Oakland
Krowswork
Harvey Milk Center for the Arts
SomaArts
ArtSpan
PROArts Gallery
Intersection for the Arts
And here are instructions for submitting your work to our friends over at SFCamerawork.
From their site:
Each year, SF Camerawork stages six to eight major exhibitions featuring photography, video, digital media, and film. Additionally, public programming in conjunction with exhibitions often includes performances, screenings, readings, and lectures. Camerawork’s program calendar, conceptualized and organized by Camerawork’s Curator, Curatorial Council, and guest curators, is scheduled 18—24 months in advance.
Submissions should contain the following:
1. Up to 20 digital images formatted as JPEG files, not to exceed 800 x 600 pixels, 180 dpi. Please label each image file with your name and a number that corresponds to an annotated image list (see #3).
2. Up to three DVDs with up to three works (or excerpts of works). There is no duration limit. Please label the file with your name and a number that corresponds to an annotated image list (see #3).
3. An annotated image list (PDF or Word document) to correspond with visual support materials. Please include the numeral corresponding to each image or video, the title, series (if applicable), year, medium, and a brief description of each work.
4. Relevant printed materials including brochures, publications, books, etc.
5. For websites and web-based work, please submit a list of URLs.
6. A current resume or curriculum vitae and artist statement (PDF or Word documents). Your artist statement should describe your work in a simple and straightforward manner, and should not exceed one page.
7. A self-addressed stamped envelope. Submissions will not be returned without an SASE.
Please do not submit original artwork.
Send submissions to:
Chuck Mobley, Director
SF Camerawork
1011 Market Street, Second Floor
San Francisco, CA
94103

Bringing Kodachrome Back from the “Dead”
Garnell brought my attention to this fantastic experiment by photographer Chuck Miller, written up on PetaPixel.
Miller’s process went something like this:
He composed the photograph using a tripod, and shot the image through a red Bower 2 filter, then reshot the same image green with a Tiffen 58 filter and blue Tiffen 47 filter. His images were process by Film Rescue International, and scanned.
Look for the KR 64 in Miller’s negative below.


Using this as a alignment point, Miller layered all 3 images to create the final color image:

For those of you who don’t remember Kodachrome film, here’s a little history on the content of its fantastical nature.
Kodachrome was the first accessible color film that used a subtractive color method. Up until its recent discontinuation in 2009, it had been the oldest surviving brand of color film, the subject of a song by Paul Simon, as well as a national park namesake.
Most of us have been around long enough to watch most movies shot with Kodachrome film, sold exclusively through Technicolor Corp as “Technicolor Monopack.”
Kodachrome films are “non-substantive.” The difference between this and substantive transparency and negative films is the lack of dye-couplers in the film’s emulsion. Dye couplers were adding during Kodachrome’s complex development process, allowing the emulsion layer to be much thinner than other films. Thinner emulsion allowed less light to scatter during exposure, and allowed much great sharpness and detail to be recorded.
The last developed roll of Kodachrome was shot by Steve McCurry, on assignment for National Geographic. Browse through all 32 frames in an article from Vanity Fair.
 Photograph by Steve McCurry.
  Photograph by Steve McCurry.
From McCurry’s experience (all 80,000 shot frames of it),
“I don’t think you can make a better photograph under certain conditions than you can with Kodachrome. If you have good light and you’re at a fairly high shutter speed, it’s going to be a brilliant color photograph. It had a great color palette. It wasn’t too garish. Some films are like you’re on a drug or something. Velvia made everything so saturated and wildly over-the-top, too electric. Kodachrome had more poetry in it, a softness, an elegance. With digital photography, you gain many benefits [but] you have to put in post-production. [With Kodachrome,] you take it out of the box and the pictures are already brilliant.”
Anyone out there have their own Kodachrome images to share? Feel free to share them on our Facebook page.