
10 Tips for Mastering Landscape Photography
Mastering landscape photography can be a lifelong pursuit.
From chasing the best light to shooting in inclement weather, dealing with crowds and lugging your prime lenses on a long hike, landscape photography is full of challenges. That said, there's no greater feeling than being surrounded by nature, pressing down the shutter and knowing you've just created a masterpiece.
Now, to help you on your next outdoor adventure, we've assembled a collection of simple yet powerful techniques to improve your landscape photography.
1. UNDERSTAND depth of field AND FOCUS
>> In landscape photography, focus is of paramount importance. For sweeping vistas, the simplest way to achieve sharp photos is to use a small aperture setting (such as f/8, f/16, etc ). The smaller your aperture (and larger the f/stop number), the greater your depth of field.
Here's a great overview of aperture and depth of field.
 Photograph by John Harrison Follow John on Instagram - Facebook
2. Work with weather
>> Sure, photographing landscapes on a bright and sunny day will produce nice and even images. However, braving the elements and shooting in inclement weather can lead to something far more striking, emotional and awe-inspiring. When preparing for your outing, make sure to scout your location beforehand and check the weather conditions in advance. Also, remember to protect your gear by packing preventive measures, such as a rain cover for your camera, cloths to wipe down your gear, extra batteries if it's cold ... and proper clothes for yourself.
 Photograph by Niall David Follow Nial on Instagram - Facebook - Twitter
3. Tripods can be your Best Friend
>> Most people use a tripod to prevent camera shake and ensure their photos come out sharp in low light or small aperture situations. However, for landscape photographers, "the waiting game" is another key reason to use a tripod. Basically, you'll want to find a perfect spot, put your camera on a tripod, frame your photograph ... then sit around and wait for the perfect light and moment to present itself. For extra insurance when it comes to camera stillness, consider investing in a cable or wireless shutter release.
 Photograph by Jay Graham
4. Experiment with your Foreground
>> One element that can make or break your landscape image is the foreground. When setting up your shot, consider using leading lines; or, try placing your horizon lower to capture a different and interesting perspective. Don't forget about your depth of field and remember to keep your aperture on the larger side to keep as much of your image in focus as possible.
 Photograph by Meghan Brabant Follow Meghan on Facebook - Instagram
5. USE LEADING Lines
>> Leading lines are extremely vital when it comes to photography, as you'll want to guide your viewer’s eyes across your image. Lines can help you guide your viewer's eye to the main point of interest and also create a feeling of depth and scale to your image. A few examples of natural leading lines you might find would be roads, railroad tracks, streams, pathways, etc.
 Photograph by Greg Goodman Follow Greg on Instagram - Facebook
6. Don’t forget about the sky!
>> A truly great landscape photograph has a well balanced mix of beautiful sky and captivating foreground. However, Mother Nature, time constraints or happenstance may have other ideas. In those situations, don't be afraid to focus on one of the two elements and see how the other falls into place. An interesting foreground can sometimes make up for a bland sky. Conversely, many landscape photographers fill most of their frame with a beautiful sky of dark or dreamy clouds. It's amazing how many different emotions the air above can convey. Have fun and experiment.
 Photograph by Josh Berger Follow Jsh on Instagram - Facebook
7. The Power of Movement
>> Though landscapes are usually sought after for their peaceful, quiet and overall serene qualities, landscapes can be a perfect place to capture movement. Take a moment to look around you and observe the wind rustling through the trees, birds in flight, waves crashing over rocks and even clouds moving overhead.
 Photograph by Justin Katz Follow Justin on Instagram - Facebook
8. Two words - Golden Hours
>> Twice a day, the landscape is bathed with beautiful golden light ... instantly making any photograph more warm, vibrant and magical. Specifically, the "Golden Hours" are the times just after dawn and just before dusk, when the sun is still low on the horizon. The light is a perfect shade of gold, which can create many interesting elements such as shadow, silhouettes and patterns.
 Photograph by Lisa Fielder
9. Find your Focal Point
>> Focal points are a crucial factor when it comes to photography. Without them, your image can come off as empty, dull and lacking purpose, which tends to make viewers move on rather quickly. Think carefully about your composition and always consider the rule of thirds to make your images come alive. You focal point could range from a building or structure to an interesting rock, tree, animal, person ... sky's the limit, so go out there and get creative!
 Photograph by Nathan Wirth Follow Nathan on Facebook - Instagram
10. Have fun and Experiment!
>> Photography is about having fun, so always remember to try new ideas and concepts and get out of your comfort zone! Good luck shooting!
 Photograph by Seth Dickerman

Why Prints Still Matter
In a world of digital media files, why does printing photographs still matter?
Whatever camera you use to make a photograph, a print is still the ultimate expression of your creative vision. Plus, they don't need power plugs to survive.

First, let's discuss the nostalgia of prints...
Forget what you've learned about the technical aspects of photography and remember why we press the shutter in the first place.
We photograph to remember ... to capture a moment in time that allows us to control both what we see and what the viewer takes away from the shot. Printing photographs allows a much more meaningful way to observe, improve and appreciate all the effort that goes into the work.
A printed photograph becomes a real object. It's something you can hold and touch, rather than an image among thousands you can see on a screen.
A print will last a lifetime
One of the best parts about printing a photograph is that prints typically withstand the test of time. Most professional papers are guaranteed to last at least 100 years, and a quick Google search for "photography from the 1800s" shows that your prints will probably last even longer.
Now, compare that to digital files and think about how technology is constantly changing. Remember floppy discs? VHS cassettes? Zip Drives? Even CDs/DVD's are on their way out. Apple has been ensuring this for years, as Macbook Pros don't even come with disc drives anymore.
With prints, you'll be able to leisurely enjoy your work for years to come ... without the worry of computer crashes, hard drive backups or rapidly changing technology. Sure, your negatives will still be digital, but at least you'll also have something tangible.
Prints help you grow as a photographer
Prints are also the best way to receive feedback on your work. If you are looking to improve and receive critiques on your photography, the easiest way to do so is by showing someone your prints.
Holding your printed work allows a fresh perspective where you will be able to notice different facets of your work that you might have missed before. Parts that are too dark, too light, dust, color variation...these are all things that might be overlooked on a computer screen.
Plus, a print will help you determine if you have correctly calibrated your monitor.
Printing matters as a professional photographer
As a professional and full-service photographer, there are many benefits to being able to produce high quality prints of your work. Let's explore a few reasons why:
CUSTOMER EXPERIENCE
Making prints for your clients shows that you care about their customer experience. Providing their images in their final polished form also shows that you are a full-service photographer, which is a rarity nowadays.

Image a scenario where a potential client wanted to see photographs of a wedding you shot. Instead of only being able to provide images on a screen, you can dazzle them with prints that they can physically hold and appreciate. It shows you care about your work, and are willing to go the extra mile to give your client what they want.
ADDITIONAL REVENUE
As a photographer, offering printed photographs gives the opportunity to make additional income instead of just making money from session fees.
QUALITY CONTROL
Quality control is essential for a full-service professional photographer! When you make prints for a client, you can control the quality of the finished product ... as opposed to leaving it up to your patron to produce their own (potentially off-color and low quality) prints.
SUPPORTING THE ART INDUSTRY
Above all, printing your work supports the intricate web of the art industry ... much of which is still locally-owned. In addition to getting a physical print, you are supporting businesses that help artists connect with clients, expand their trade and, above all else, continue doing what we love to do.
So, Why Do Prints Matter?
While the world seems to be propelling into a digital age with access to hundreds of thousands of images at a moments notice, it's important to remember what photography really stands for.
Photography is more than just a paycheck. It's the act of capturing a moment in time and preserving that memory for years to come.
When you take the time to learn how to be a professional and full-service photographer and improve your trade, you show that it's more than just about pictures, it's about loving what you do- and every client wants to see that in their photographer.


ICC Profiles » a photographer's guide
If you have ever taken a photograph or had one printed, you have dealt with color profiles … perhaps without even knowing it.
What may seem like an innocuous option in a drop-down menu might mean the difference between an accurate, high quality representation of your image and a lackluster, disappointing imitation. So, just what are color profiles and why are they important?
Every digital camera and printer has its own idea of what a specific color looks like. In order for the devices to communicate with each other properly — and reproduce the image without color distortion — they need to find common ground. That's where ICC profiles come into play.
What is an ICC profile?
An ICC profile is a set of data that characterizes a color input or output device (or a color space) according to standards promulgated by the International Color Consortium (ICC).
The International Color Consortium was formed in 1993 by eight vendors in order to create an open, vendor-neutral color management system, which would function transparently across all operating systems and software packages.
ICC profiles provide a common understanding between multiple editing programs such as Photoshop, Lightroom, Capture One and others.
These profiles act as languages of color and compression, interpreting the image as close as possible across devices; from the camera to the monitor, the monitor to the printer, the printer to the paper. If these settings are not aligned across the different platforms, information gets lost in translation.
An Intro to Color Profiles & Color Spaces
In order to have a clear understanding of ICC profiles, you have to be familiar with color profiles and spaces.
Color profiles include CMYK, RGB, LAB, etc with more specific versions depending on the output. Each one represents a color gamut, which basically represents the range of colors that are supported. A printer has it’s own specific gamut of colors it can print, as does a camera when it captures an image.
Additionally, a particular paper has it’s own color gamut ... as does a specific monitor. Ultimately, different types of printers, cameras, papers, and monitors all have their different color gamuts.
For now, let’s focus on the camera.
On it’s own, a camera’s color information doesn’t really mean anything. Before the data it collects can be useful, we need to know the specific colors that the information corresponds to. That's why we map the colors in the image into a color space.
A color space is basically a standard that defines a specific set of colors. When we map the colors in our image into a color space, then the color values that our cameras captured have specific meanings. Now you may not know this, but most cameras have been mapping their colors into a color space all along.
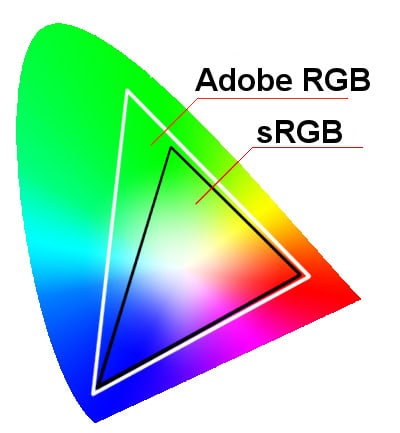
Most SLR cameras offer a choice of two color spaces — Adobe RGB 1998 and sRGB — which are the most common color spaces (gamuts) for images used for display (digital format, web, monitors, projectors, etc).
The shortcomings of sRGB
Currently, sRGB color space is the default color space on most cameras (Canon, Nikon, Sony, etc.) and photo editing systems, such as Photoshop, Aperture, Lightroom, etc. Unfortunately, sRGB tends to lose a lot of colors out of spectrum.
If you shoot in a format such as JPEG, image information, including color, is compressed and lost. Instead, we suggest shooting your images with the RAW setting, because no information is compressed, allowing you to produce higher quality images.
Below is an example of the difference between sRGB profile and Adobe RGB profile. Note how many more colors, especially green, are made available with Adobe RGB.
How to Use an ICC Profile
In order to produce the highest quality image, it’s important to play attention to your ICC profiles. Each printer, computer, camera, and paper all will have their own unique ICC profile and will allow you to be able to pick and choose which you like best for your work.
So now that we know how important ICC profiles are when it comes to taking, editing, and printing your images, how do you use them? Here's a step-by-step example using the ICC profiles we have available for D.I.Y. printing at Dickerman Prints!
First, download your preferred profile:
HOW TO INSTALL AN ICC PROFILE ON MAC

- Locate and unzip the file you just downloaded
- Open a separate Finder window
- From the main menu, select "Go -> Go to Folder"
- Type in the following: ~/library/colorsync/profiles
- Drag the profile from your downloads folder into the colorsync folder that you just opened
- That's it!
HOW TO INSTALL AN ICC PROFILE ON WINDOWS PC
- Locate and unzip the file you just downloaded
- Right click on the unzipped ICC file and select "Install Profile"
- That's it!
Setting up an ICC Profile in Photoshop
1. Make sure you have restarted Photoshop after installing your ICC profile.

2. From the main menu, select "View -> Proof Setup -> Custom"
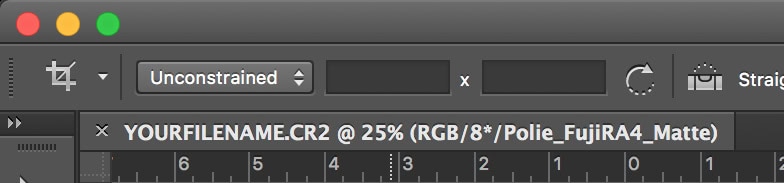
3. Under "device to simulate," select the option for either:
Polie_FujiRA4_Matte or Polie_FujiRA4_Glossy
4. Once selected, the rest of the window should look like the image to the right.
5. Click save, name your profile and click OK to close the window.
6. To confirm that it has been installed, you can once again use the menu and navigate to "View -> Proof Setup." On the bottom, you will see a new option with whatever name you specified in Step 5.
HOW TO USE AN ICC PROFILE IN PHOTOSHOP
To use your new profile, simple press command + Y (Mac) or control + Y (PC)
To confirm that it's working, look at the filename of your active document. At the end, you should see the name you specified earlier.
HOW DO I OPTIMIZE MY IMAGE USING THE ICC PROFILE?
After activating the ICC profile, you may notice a shift in colors. What you are seeing is a more realistic representation of what your image may look like when printed. You should use these colors as a guide when prepping your images for printing.
Also, please keep in mind, our ICC profiles are meant to be used with a properly calibrated monitor. If you want to ensure that "what you see is what you get," please feel free to bring your files into our lab and use our complimentary and calibrated workstations! Organic espresso and tea included!