DIY C-Print Tutorial
How to use our Print on Demand service
Print from the comfort of home; or, in our free color-managed digital darkrooms.
WHAT IS A PRINT ON DEMAND “CANVAS?”
Think of your paper as a blank canvas where you can choose the size, quantity and placement of each image.
For example, using an 18×30″ canvas, you could make a single large print, two 11×17″ prints, four 8×10″ prints… or even twenty 4×6″ prints. The choice is yours.
PREPPING YOUR IMAGES
Before using our canvases, you need to prep each image for printing.
Step 1: Open Photoshop – or your favorite editing program – and set the properties of each image to the following:
* Color Space: Adobe RGB 1998
* Resolution: 254dpi
* Printer profile: laser3.icc – click here for instructions
Step 2: Color correct and adjust your image as needed.
Step 3: Save your image as a flattened TIFF file – making sure no printer profiles are attached. (If you plan on printing multiple sizes of the same image, we recommend saving each one individually at this step.)
CHOOSE YOUR CANVAS SIZE
Our Print on Demand service is available in six canvas sizes.
To make your own canvas, create a new document with the height and width matching your canvas size of choice. It should be created at 254dpi in the Adobe RGB 1998 color space.
Download our premade canvas templates.
TILE YOUR IMAGES
This is the fun part! Either drag or copy your images from the files you created earlier into your new canvas document.
Finally, line the images up in a row to make cutting easier.
SAVE AND UPLOAD
Save your file as a flattened TIFF with the layers discarded. For help with this, please view the second video on the right.
Upload your images and we will take care of the rest.
HOW TO USE A PRINTER PROFILE
If you want to soft proof your image more accurately on screen, download our printer profile.
INSTALLING AN ICC PROFILE ON MAC
- Locate and unzip the file you just downloaded
- Open a separate Finder window
- From the main menu, select “Go -> Go to Folder”
- Type in the following – ~/library/colorsync/profiles
- Drag the profile from your downloads folder into the colorsync folder that you just opened
- That’s it!
INSTALLING AN ICC PROFILE ON WINDOWS
- Locate and unzip the file you just downloaded
- Right click on the unzipped ICC file and select “Install Profile”
- That’s it!
SETTING UP AN ICC PROFILE IN PHOTOSHOP
- Make sure you have restarted Photoshop after installing your ICC profile
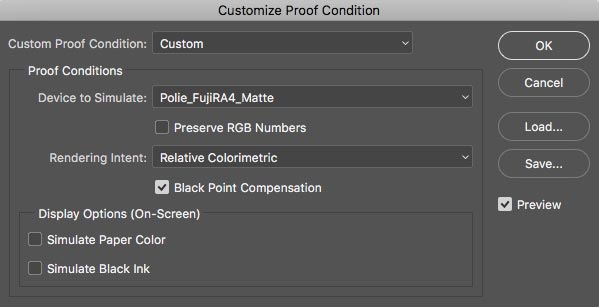
- From the main menu, select “View -> Proof Setup -> Custom”
- Under “device to simulate,” select the option for either Polie_FujiRA4_Matte or Polie_FujiRA4_Glossy
- Once selected, the rest of the window should look like the image to the right.
- Click save, name your profile and click OK to close the window.
- To confirm that it has been installed, you can once again use the menu and navigate to “View -> Proof Setup.” On the bottom, you will see a new option with whatever name you specified in Step 5.
HOW TO USE AN ICC PROFILE IN PHOTOSHOP
To use your new profile, simple press command + Y (Mac) or control + Y (PC).
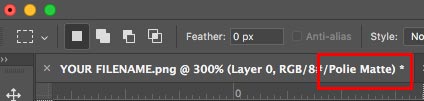
To confirm that it’s working, look at the filename of your active document. At the end, you should see the name you specified earlier.
HOW DO I OPTIMIZE MY IMAGE USING THE ICC PROFILE?
After activating the ICC profile, you may notice a shift in colors. What you are seeing is a more realistic representation of what your image may look like when printed on our Polie. You should use these colors as a guide when prepping your images for printing.
Also, please keep in mind, our ICC profiles are meant to be used with a properly calibrated monitor. If you want to ensure that “what you see is what you get,” please bring your files to the lab and use our complimentary and calibrated workstations. Organic expresso and tea included!
If you have any questions about the process, please call us at 415.252.1300.